MEMBERS ONLY: To gain full access to the Half Yard Club projects please login or sign up
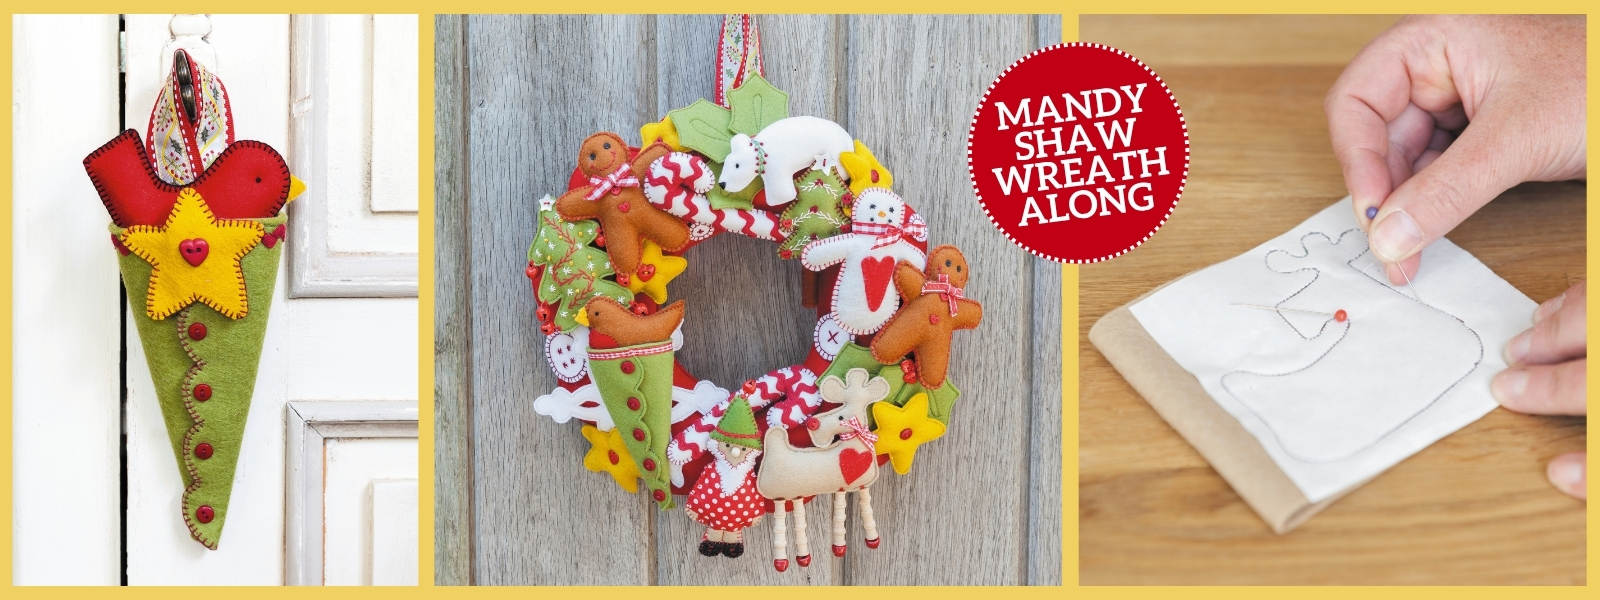
Gingerbread Man & Cone – Part Four | Mandy Shaw Wreath-Along
Easy |

Quick Links: What you'll need Project steps
Hurrah – you're over the halfway mark and it's time to make part four of your Christmas Wreath-Along!
Over the course of this week, we’ll be sharing two felt projects every day, giving you everything you need to create a beautiful handmade Christmas decoration that you’ll be proud to hang on your door.
Well, in part four, we're actually sharing three new decorations! The Christmas cone is a fantastic alternative to a mini stocking for those all important tree presents, and we've given it pride of place on our wreath. It's also just the right size to tuck in a gingerbread man and a felt dove. Come back tomorrow for part five!
The Stitch and Cut Technique
Mandy has used the 'Stitch and Cut' technique to make most of the Christmas characters and motifs. The advantage is that you can make your decorations in batches at the sewing machine, leaving the hand finishing for later if time allows. You will find that it is a very accurate way to create lots of decorations in super-quick time. Mandy likes to use iron-on freezer paper for making the patterns, but if you have none, just use ordinary paper and pin it onto the fabric instead. 1. Trace the template onto freezer paper but do not cut out. 2. Take your main piece of felt and fold it in half. Iron the freezer paper pattern onto the folded felt fabric. 3. Stitch on the marked line using the sewing machine set to a very small stitch (no. 2), and sew all the way round leaving no gaps. 4. Remove the freezer paper pattern; it will help you to tear off the paper more easily if you scratch along the stitching line first with a thick pin or needle. 5. Cut out the decoration about 2mm (1⁄8in) from the sewn line as neatly as you can. Cut a slit (or slits) where indicated on the pattern through one layer of the fabric only, and gently fill with stuffing. Ladder stitch the stuffing slit closed.How To Finish Your Felt Decorations By Hand
Once you have made all your decorations at the machine, you may want to finish around the outside edges with a hand-stitched blanket stitch worked in a contrasting embroidery thread. This is a nice relaxing activity for long winter evenings. However, if you have cut out very neatly, there is no need to do this – although it does give a lovely hand-stitched look. The choice is up to you!Prefer To Sew It All By Hand?
Mandy has made most of the decorations on the machine, stitching on the marked lines of the pattern before cutting them out, but you can just as easily make your decorations by hand if you prefer. Trace your character or motif template onto plain paper and cut it out. Draw around your pattern onto felt twice and cut out the marked shapes. Place the cut felt pieces together and hold in place with a pin; sew around the edge with a hand blanket stitch leaving a small gap for stuffing – do not unthread the needle. Fill with stuffing, then continue the blanket stitch to sew up the gap.When It's Time To Assemble Your Wreath
Mandy recommends that you use a glue gun to fix the decorations in place onto the wreath as sewing or pinning them in position would be very tricky. However, before you do so, lay them out on the wreath first to get the best arrangement. For example, Mandy glued the snowflake in position first and added the stars last of all, to provide a dash of colour wherever it was needed.About the Author: Mandy Shaw
Mandy Shaw runs Dandelion Designs, a craft design and kit company in Hailsham, East Sussex. She teaches weekly quilting classes and lectures and demonstrates all over the country. Her work has featured on BBC2's Leisure Hour and she also appeared on Kirstie Allsopp's Homemade Home. She has written for a number of craft publications including Popular Patchwork and Fabrications magazines. You can visit her website at dandeliondesigns.co.ukAbout the Book
This tutorial is taken from Mandy Shaw's book How to Make Christmas Wreaths and Garlands (David & Charles). Packed with ideas for creating beautiful decorations from fabric and felt, Mandy guides you through a collection of Christmas wreaths and garlands, with projects designed to help you create decorations that can be enjoyed year after year.Member Discount
All Half Yard Sewing Club Members can get 30% off How to Make Christmas Wreaths and Garlands with their membership. Just click here for your exclusive offer code!MEMBERS ONLY: To gain full access to the Half Yard Club projects please login or sign up
You will need:
Equipment
- Sewing machine
- Sewing needle
- Scissors
- Pins
Materials
Materials for one dove:
- 25 x 15cm (10 x 6in) white felt
- Sewing threads: white and yellow
- Cup of stuffing
- Embroidery thread: red and black
- 2.5 x 2.5cm (1 x 1in) yellow felt
- One micro button
Materials for one gingerbread man
- 40 x 25cm (16 x 10in) brown felt
- Sewing thread: brown, white, black and red
- Cup of stuffing
- Red embroidery thread
- 13 x 13cm (5 x 5in) check fabric
- Two small black buttons
- Two tiny red heart-shaped buttons
- Three small red heart-shaped buttons
- 25cm (10in) length of white mini ric-rac
Materials for one gingerbread baby
- 25 x 15cm (10 x 6in) brown felt
- Brown sewing thread
- Egg cup of stuffing
- Embroidery thread: black and red
- Three tiny red heart-shaped buttons
- Torn strip of check fabric or ribbon
Materials for one Christmas cone
- Two pieces of felt each measuring 25 x 25cm (10 x 10in)
- Sewing thread to match felt
- Five buttons
- 15cm (6in) length of ribbon
MEMBERS ONLY: To gain full access to the Half Yard Club projects please login or sign up
Project steps:
Step 1
This is content that only logged members can see! Please create an account or login to be able to view project steps, otherwise you'll be limited to non-member content.
This is content that only logged members can see! Please create an account or login to be able to view project steps, otherwise you'll be limited to non-member content.
Step 2
This is content that only logged members can see! Please create an account or login to be able to view project steps, otherwise you'll be limited to non-member content.
This is content that only logged members can see! Please create an account or login to be able to view project steps, otherwise you'll be limited to non-member content.