MEMBERS ONLY: To gain full access to the Half Yard Club projects please login or sign up
English Paper Piecing Cushion Cover | Beginner Sewing Project | Photo Guide
Easy |

Quick Links: What you'll need Project steps
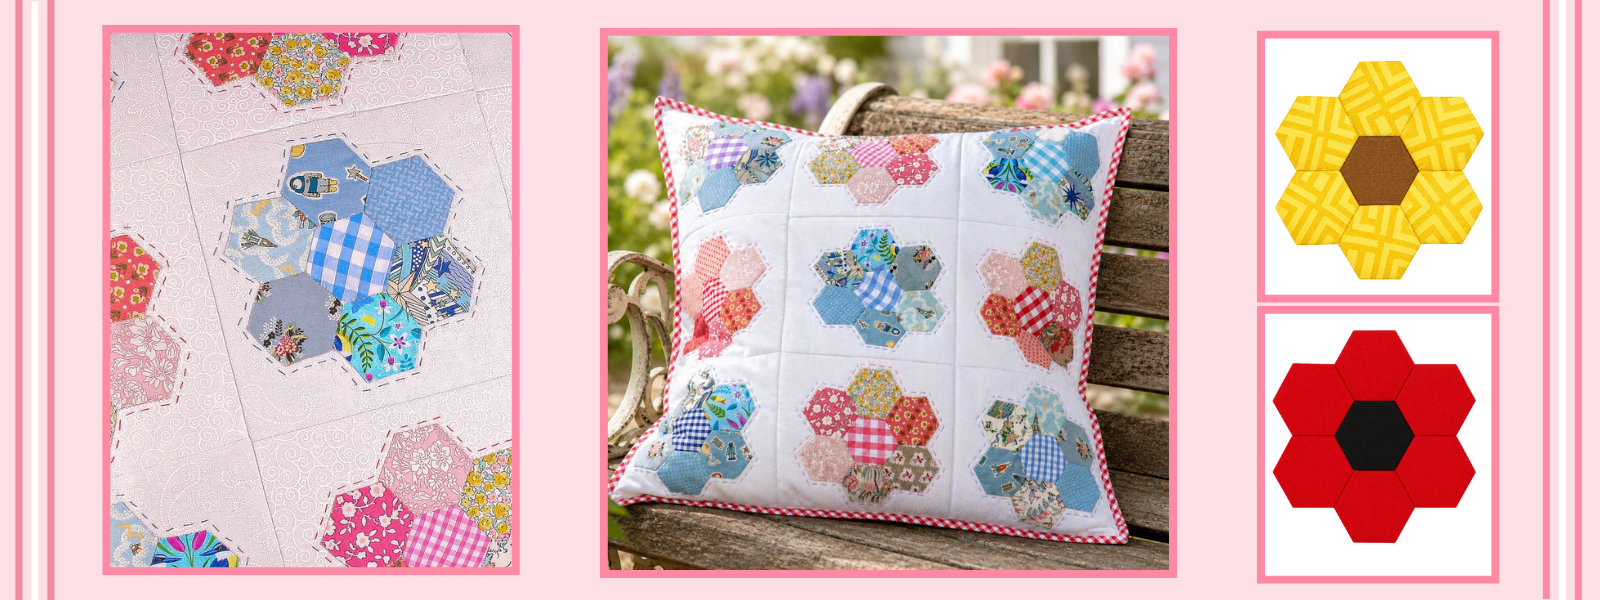
This simple Grandmother’s Flower patchwork cushion brings timeless charm to your home, showcasing a classic English Paper Piecing design and easy hand quilting.
This is the perfect project if you enjoy hand-sewing patchwork or would like to give it a go. You’ll find that hand-stitching the pieces is a mindful way of spending time, particularly if you enjoy sewing outside on warmer days – or in front of the TV when it’s cold!
As an introduction to EPP for those who haven’t tried it before, you’ll create quite a large cushion with only nine blocks, making it a project that isn’t too time-consuming. However, if you prefer, you can machine sew the hexies – I’ll explain how in the steps. I’ve used top-stitch thread to quilt around the flowers, but one strand of embroidery thread would also work well.Construction
The nine panels on the cushion front each feature a flower made by joining seven hexagons together – six for the petals and one for the flower centre. I’ve also added six hexagons to the cushion back so it’s decorative too. The flowers are stitched to a background square, backed, quilted and then the squares are joined together. The cushion has an envelope back and bound edges.
Fabric choices
For the patchwork, I’ve used up some of my scraps, grouping mainly blues and mainly reds together, and used a gingham in the centre of each flower, again in either red or blue. Of course, you can use whatever colours you like – see Make It Your Own below for further ideas.
For the background, I’ve used two different white-on-white fabrics to create a subtle difference between the red and blue flowers. I think the cushion would be fun if all the blocks were different colours!
Make it your own!
- Use yellow fabrics for the petals with a brown centre to suggest sunflowers; choose red petals with a black centre if you like poppies, or white petals with a yellow centre for daisies.
- I chose white-on-white fabric for my background, but you could use any neutral colour, a mid-tone or even a dramatic dark colour.
- Do some free-motion stitching on the flowers once you’ve completed the cushion front to add extra texture.
By the end of this project, you’ll have:
- Created a beautiful cushion.
- Done some simple English Paper Piecing patchwork.
- Stitched a bound edging.
You may also like:
- Patchwork Pouch
- Pointed Star Patchwork Cushion
- Quilt Block Keeper
- Quick Make: Quaint Cottage Pincushion
MEMBERS ONLY: To gain full access to the Half Yard Club projects please login or sign up
You will need:
Equipment
- Sewing machine with a standard foot
- Fabric scissors
- Fabric glue pen
- Spray starch such as Best Press
- Basting spray
- Appropriate needles for hand sewing and for the quilting
Materials
- Lots of scraps of fabric, each measuring approx. 3in (7.5cm) square – you’ll need 69 pieces
- 44 x 8in (112 x 20cm) of each of two white-on-white fabrics, or enough fabric to cut nine 8in (20cm) squares for the background – these could all be cut from one fabric or from different ones
- 20 x 20in (50 x 50cm) of lining fabric
- 44 x 24in (112 x 60cm) of fabric for the cushion back
- 54 x 6in (138 x 15.25cm) piece of 80/20 wadding – or enough to cut nine 6in (15.25cm) squares if your wadding is a different width or you wish to use up leftovers from another project
- Sewing threads to match or blend with your fabrics
- Top-stitch thread for the hand quilting – I used blue and red to match my flowers – or you can use one or two strands of embroidery thread as an alternative
- 20in (50cm) square cushion pad
MEMBERS ONLY: To gain full access to the Half Yard Club projects please login or sign up
Project steps:
Step 1
This is content that only logged members can see! Please create an account or login to be able to view project steps, otherwise you'll be limited to non-member content.
This is content that only logged members can see! Please create an account or login to be able to view project steps, otherwise you'll be limited to non-member content.
Step 2
This is content that only logged members can see! Please create an account or login to be able to view project steps, otherwise you'll be limited to non-member content.
This is content that only logged members can see! Please create an account or login to be able to view project steps, otherwise you'll be limited to non-member content.