MEMBERS ONLY: To gain full access to the Half Yard Club projects please login or sign up
Quilt-Along: Elephant Border Block of the Month 9 | 2026
Moderate |

Quick Links: What you'll need Project steps
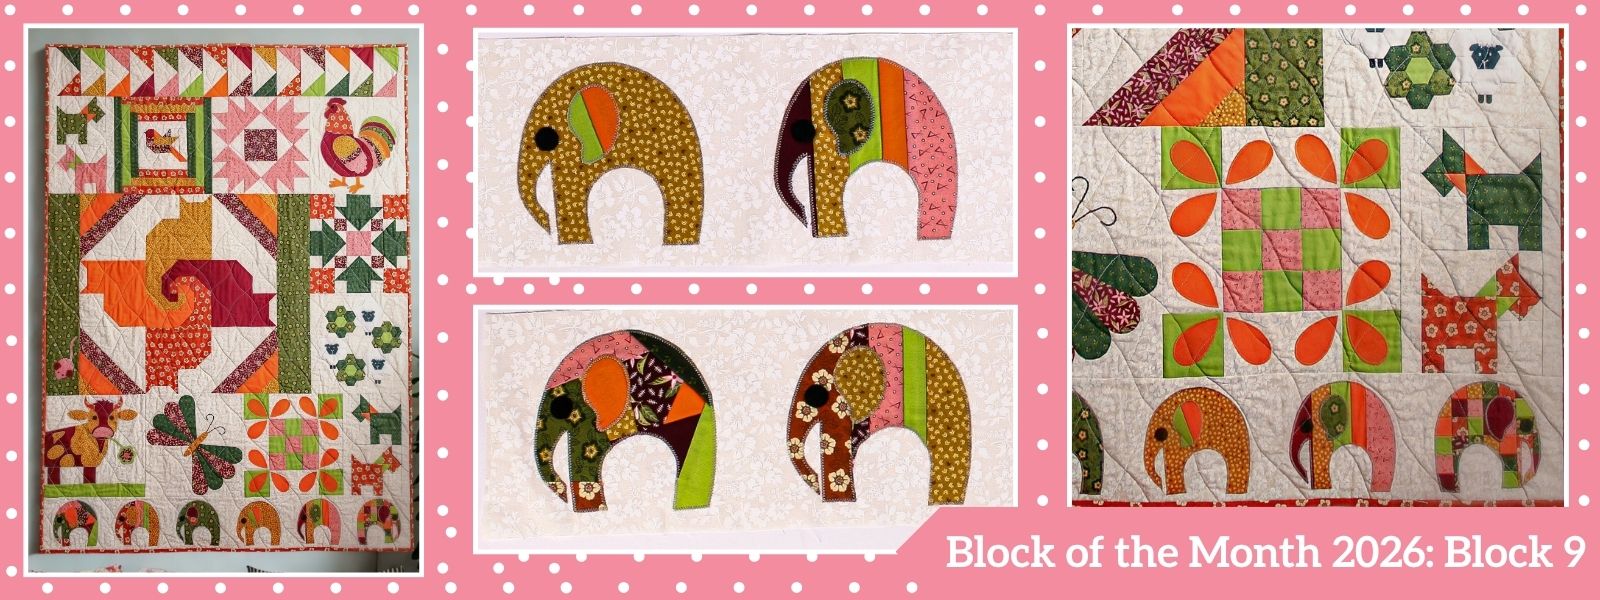
Make this colourful parade of elephants while learning different ways of patchworking fabrics together and let your creativity shine through.
This fun border uses various techniques to make a selection of pieced fabrics for the machine-appliquéd elephants. It is a great way of using up some of your scraps left over from earlier blocks and it is an opportunity for some creative play too.
One of the elephants has a crazy-patchwork body, two are striped, one has a body of patchwork squares and two are cut from just one fabric apart from their patchwork ears (which are leftovers from other elephants). It’s up to you to decide which fabrics to use but we’ll give you the instructions to follow the various techniques. And, of course, if there’s a particular technique you enjoy, you can make more of the elephants using that one.Notes
- Notice that one of the elephants has got distracted and is facing the opposite way to his friends. For the left-facing elephants, draw around the body and ear templates just as they are, facing towards the right; for the right-facing elephant, these templates should be facing towards the left, so turn your templates over to use the mirror image.
- For the crazy, stripy and plain elephants you’ll need to cut or create a piece of fabric measuring approximately 5¾in (14.5cm) square, though check the size against the template to be sure you have a large enough piece.
- Crazy patchwork is like Log Cabin patchwork but freeform – see the Crazy Patchwork Machine Cover Set for a video showing the process, though I used simple strips of fabric in that project. I also used a square of scrap fabric as a foundation for the patchwork in that project, and you can do the same here, if you find that easier.
Finished untrimmed block size: 44½ x 6½in (113 x 16.5cm)
Note: use a ¼in (5mm) seam allowance unless otherwise stated.
By making this block, you'll have:
- Created crazy patchwork.
- Done strip-pieced patchwork.
- Learnt grid patchwork piecing.
- Machine appliquéd using fabric adhesive sheets.
MEMBERS ONLY: To gain full access to the Half Yard Club projects please login or sign up
You will need:
Equipment
- Sewing machine
- Rotary cutter
- Quilting ruler
- Quilting mat
- Scissors
- Templates for elephants, ears and eyes
- Pencil or temporary fabric marker pen (not heat-erasable)
Materials
Fabrics (see my Introduction to Block of the Month). From these, you will need to cut:
- Two 22½ x 6½in (57 x 16.5cm) strips in B/G; join them at one end to create a piece measuring 44½ x 6½in (113 x 16.5cm) – if you need to join several 6½in (16.5cm) deep pieces of B/G fabric to make the required size, that’s fine
- Selection of all fabrics, ideally using up your scraps
- Small amount of black felt for the eyes
- 7in (18cm) square of iron-on interfacing
- Fabric adhesive sheets (Bondaweb or Heat n Bond)
MEMBERS ONLY: To gain full access to the Half Yard Club projects please login or sign up
Project steps:
Step 1
This is content that only logged members can see! Please create an account or login to be able to view project steps, otherwise you'll be limited to non-member content.
This is content that only logged members can see! Please create an account or login to be able to view project steps, otherwise you'll be limited to non-member content.
Step 2
This is content that only logged members can see! Please create an account or login to be able to view project steps, otherwise you'll be limited to non-member content.
This is content that only logged members can see! Please create an account or login to be able to view project steps, otherwise you'll be limited to non-member content.