Register for free! If you'd like to view this project, simply register here or log in if you already have an account.
Welcome to Debbie Shore's Block of the Month Quilt 2026
Moderate |

Quick Links: What you'll need Project steps
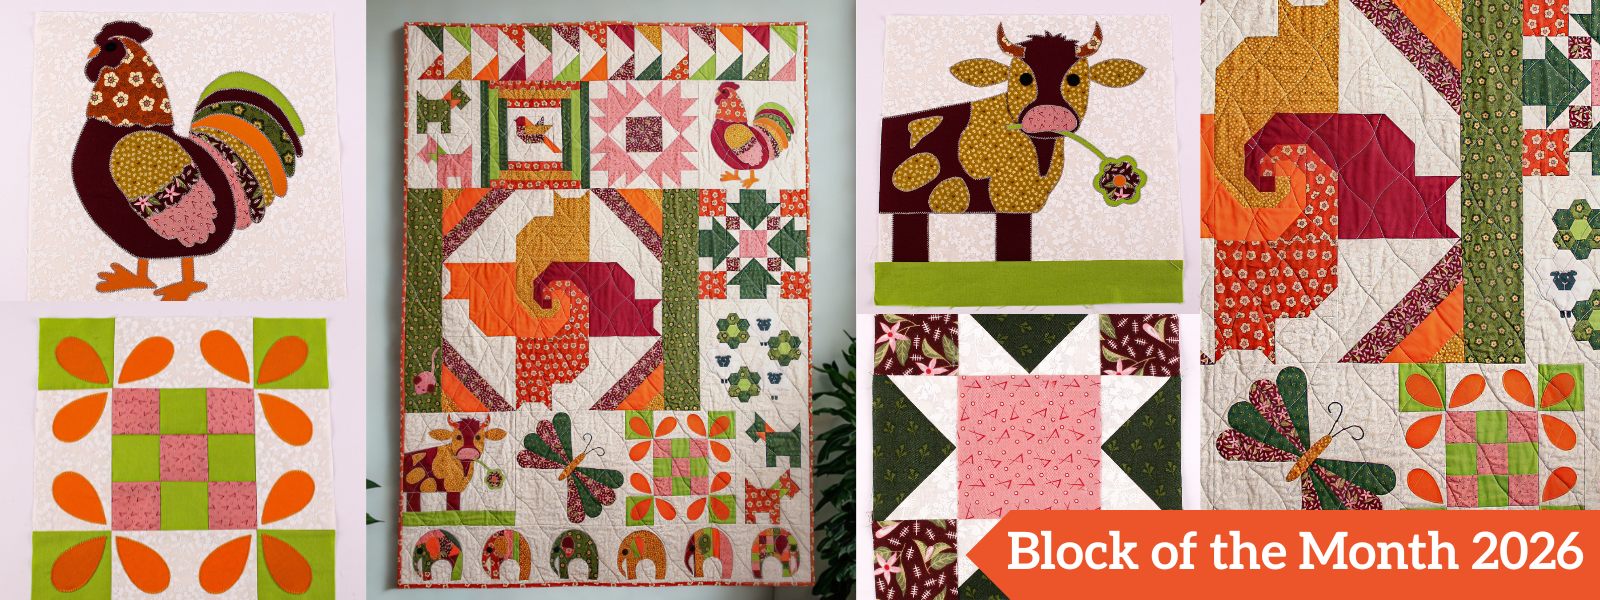
Welcome to the 2026 Block of the Month – ‘All Creatures Great and Small’
We’ve called this year’s Block of the Month quilt ‘All Creatures Great and Small’ as the 44 x 60in (112 x 152.5cm) quilt features a number of appliqué and pieced blocks, all relating to animals, birds and insects. There are eleven blocks and two borders in total, so the two puppy dog blocks will come under the same month to allow the project to be completed within the year.
The pieced blocks include a variation on Bear’s Paw, the Crow’s Foot block and a pretty block called Honey Bee, all surrounding the larger Twisted Cats block – and who’s spotted the pesky mouse trying to escape from the cats? The two outer borders inevitably include Flying Geese, and there’s a herd of elephants, one of which seems to have lost its way!
Where can I use it?
-
It's hoped the quilt will be loved by both kids and adults and could be used on a single bed, as a throw or a wall hanging. And don’t forget that you can use any of the blocks for other projects too:
- The Rooster and Highland Cow blocks would look great on their own displayed in a picture frame or attached to a canvas.
- The Twisted Cats block would look amazing as a stand-alone wall hanging.
- The elephant border could be made into a small nursery quilt in its own right, with sashing between the six 6in (15.25cm) blocks and framed with a patterned border.
- Who wouldn’t love a quilt full of Scottie dogs, all with different coloured bows?
- And watch this space for some additional projects made with some of the BOTM blocks from all our quilts coming up through the year!
- Hand and machine appliqué
- Half and quarter square triangles (made in several different ways)
- Flying Geese (again, made in different ways)
- Courthouse Steps
- Square Within a Square
- Dresden
- English paper piecing
- Foundation paper piecing
- Crazy patchwork
- 1in (2.5cm) square grid piecing
Techniques to expect:
There’s also a small amount of hand embroidery:
- Chainstitch
- French knots
As before, my daughter Kym and I have put together a fabric bundle for this quilt at debbieshoresewing.com, available for you to buy right now. There is limited stock, so grab a bundle while you can! The fabric bundle includes all the fabrics for the quilt top.
TIPS:
- Read through all instructions for each block before you start to sew.
- It’s a personal choice whether you wash your fabrics before you start – we didn’t.
- When cutting out, be conservative with your fabric. Keep all fabric scraps as you will be able to use these in subsequent blocks.
- Stitch with an accurate ¼in (5mm) seam allowance throughout, unless otherwise stated.
- Stitch all seams with the right sides of fabric facing, unless otherwise stated.
- Before pressing seams, set the seam first by running a hot iron along the length of your stitching. This helps the stitches to sink into the fabric and will encourage the seams to press flat.
- Generally, seams should be pressed towards the darker fabric. However, in some cases, to avoid bulk, it is necessary to press seams open or towards the lighter fabric. If you prefer to press all seams open, that’s fine.
- Be aware that in some instances the fabric edges will be on the diagonal, so try not to stretch the fabric – a light spray of starch may help to stabilise those edges.
- When cutting fabric, the size indicates the width of the piece first, followed by the length (unless otherwise stated).
- A square ruler is a useful piece of equipment to help square up your blocks. However, if you don’t have one, you could cut a square of paper or card to the size of your block (or individual unit), draw diagonal lines through all four corners and use this as a template. The 45° lines should cross in the centre of your block and dissect the four corners.
- Chain piecing is a useful technique when piecing together multiple segments (often identical units within a block) one after another, in a long chain with a continuous stitch. Just join one pair of pieces and then the next – there’s no need to cut the thread between stitching each segment – and simply continue to run a few stitches between each unit. Don’t worry, it won’t harm your machine, and it will save you time and thread. Cut the units apart at the end of the run. For some guidance, take a look at my video.
The first block will be out January 3rd 2026. I'll link all the blocks below as they come out, so you can always find them when you need them!
Block 1: Honey Bee
Block 2: EPP Butterfly
Block 3: Highland Cow
Block 4: Crow’s Foot
Block 5: Courthouse Bird
Block 6: Twisted Cats
Block 7: Grazing Hexie Sheep
Block 8 + 13: Puppy Dogs
Block 9: Elephant Border
Block 10: Bear’s Paw
Block 11: Rooster
Block 12: Flying Geese
Register for free! If you'd like to view this project, simply register here or log in if you already have an account.
You will need:
Equipment
- Sewing machine
- Iron
- Rotary cutter, cutting mat and ruler
- Scissors
- Pins and/or quilting clips
- Quick unpick/seam ripper
- Erasable fabric marker pen or pencil
- Fabric glue pen
- Hand-stitching needle
- Optional: square ruler (useful but not essential), spray starch, spray adhesive
Materials
Fabrics (all fabrics are 42/44in (106/112cm) wide); if making your own choice of fabrics, you may be able to use some fabrics from your stash:
-
Fab A – 13¾in (35cm) x WOF (width of fabric)
-
Fab B – 13¾in (35cm) x WOF
-
Fab C – ½yd (0.5m) x WOF
-
Fab D – 13¾in (35cm) x WOF
-
Fab E – 13¾in (35cm) x WOF
-
Fab F – 13¾in (35cm) x WOF
-
Fab G – 13¾in (35cm) x WOF
-
Fab H – 13¾in (35cm) x WOF
-
Fab I – 13¾in (35cm) x WOF
-
B/G (background fabric) – 1¾yd (1.5m)
In addition to the above fabrics, to complete the quilt you will require the following:
- Felt – Scraps of black felt
- Backing fabric (not included in the kit) – one piece 48in (122cm) wide x 64in (162.5cm) long; join pieces if necessary
- Wadding – one piece 48in (122cm) wide x 64in (162.5cm) long
- Binding fabric – 15in (38cm) x width of fabric: 42/44in (106.5/112cm)
Threads:
- Neutral thread (medium grey) or thread of your choice for piecing the blocks and machine appliqué
- Black thread for hand appliqué (felt features)
- Black and white embroidery thread (embroidery features)
Everything else:
- Photocopier paper (for reproducing templates)
- Lightweight card
- Fabric adhesive sheets
- Small piece of fusible interfacing
Before you start:
I would suggest you cut out the following:
Three 12½in (31.75cm) squares in B/G for Blocks 2, 7 and 11
One 12½in x 11in (31.75 x 28cm) strip in B/G for Block 3
Two 9in (23cm) squares in B/G and two 24½ x 6½in (62.25 x 16.5cm) strips in Fab C for Block 6
One 44½in x 6½ (113 x 16.5cm) strip in B/G for Block 9 – check your B/G fabric width: we were able to nibble into the selvedge to get the extra ½in (1.25cm) width (which will fall within the seam allowance); alternatively join two strips together.
Register for free! If you'd like to view this project, simply register here or log in if you already have an account.
Project steps:
Register for free! If you'd like to view this project, simply register here or log in if you already have an account.
Step 1
This is content that only logged members can see! Please create an account or login to be able to view project steps, otherwise you'll be limited to non-member content.
This is content that only logged members can see! Please create an account or login to be able to view project steps, otherwise you'll be limited to non-member content.
Register for free! If you'd like to view this project, simply register here or log in if you already have an account.
Step 2
This is content that only logged members can see! Please create an account or login to be able to view project steps, otherwise you'll be limited to non-member content.
This is content that only logged members can see! Please create an account or login to be able to view project steps, otherwise you'll be limited to non-member content.